In this beginner’s guide to using Smartsheets for project management, you will discover the essential tips and tricks to effectively utilize this innovative tool. Whether you’re new to project management or simply looking to enhance your organizational skills, Smartsheets offers an intuitive and user-friendly interface to streamline your workflow. From setting up your project timeline to assigning tasks and tracking progress, this guide will equip you with the knowledge you need to successfully manage your projects and achieve your goals. So, let’s dive in and explore the endless possibilities that await you with Smartsheets!
Getting Started with Smartsheets
Welcome to Smartsheets! If you’re new to this project management tool, you’re in the right place. In this comprehensive guide, we will walk you through the process of getting started with Smartsheets and show you how to effectively manage your projects. Let’s dive in!
Creating an Account
To begin using Smartsheets, the first step is to create an account. Simply visit the Smartsheets website and click on the “Sign Up” button. You will be prompted to provide some basic information, such as your name, email address, and a password. Once you’ve completed the registration process, you will have access to your Smartsheets dashboard.
Navigating the Dashboard
Once you’ve logged in to your Smartsheets account, you’ll find yourself on the dashboard. The dashboard is your central hub where you can access all of your projects and collaborate with your team. Here, you’ll see an overview of your recent activity, as well as options to create new sheets, folders, and reports. Take some time to familiarize yourself with the various features and navigation options available on the dashboard.
Customizing Your Workspace
Smartsheets allows you to customize your workspace to suit your needs and preferences. You can personalize your account settings, such as your profile picture and notification preferences. You also have the option to create custom templates and styles for your sheets, making it easier to maintain consistency across your projects. Don’t forget to explore the various settings and customization options available to make your Smartsheets experience truly tailored to you.
Project Setup
Now that you’re familiar with the basics of Smartsheets, it’s time to set up your project and get started. This section will guide you through the steps to define project objectives, create a new project sheet, import existing project data, and organize project folders.
Defining Project Objectives
Before you dive into creating your project in Smartsheets, it’s important to define your project objectives. Clearly outlining what you want to achieve will help you stay focused and ensure you’re effectively managing your project. Take some time to brainstorm and document your project objectives before moving on to the next step.
Creating a New Project Sheet
With your project objectives defined, it’s time to create a new project sheet in Smartsheets. A project sheet is where you’ll organize and track all your project tasks, timelines, and resources. To create a new project sheet, simply click on the “New” button on your dashboard and select “Project Sheet.” Give your project sheet a name and start adding the necessary columns to track your project’s progress and requirements.

Importing Existing Project Data
If you already have project data stored in other tools or spreadsheets, you can easily import it into Smartsheets. This helps you avoid manual entry and saves you time and effort. Smartsheets allows you to import data from various file formats, such as Excel, CSV, and Google Sheets. Simply navigate to the “File” menu, select “Import,” and follow the prompts to import your data into your project sheet.
Organizing Project Folders
As your project progresses, you’ll likely accumulate a lot of files and documents associated with your project. To keep everything organized and easily accessible, it’s a good practice to create project folders in Smartsheets. Folders provide a structured way to store and categorize your project files. You can create folders based on project phases, departments, or any other organizational structure that makes sense for your project. To create a folder, click on the “New” button and select “Folder.”
Collaboration Tools
One of the key strengths of Smartsheets is its collaboration features. This section will cover how to invite team members, assign roles and permissions, use comments and discussions, and manage document sharing within Smartsheets.
Inviting Team Members
To collaborate effectively on your project, you need to invite team members to join your Smartsheets workspace. You can easily invite team members by sending them an email invitation from within Smartsheets. Simply navigate to the “People” tab and click on the “Add People” button. Enter the email addresses of the team members you want to invite, customize the invitation message if desired, and send the invitations.
Assigning Roles and Permissions
Different team members may have different roles and responsibilities within your project. Smartsheets allows you to assign roles and permissions to each team member, ensuring that everyone has the appropriate level of access to project information. You can assign roles such as Admin, Editor, Viewer, and more. To assign roles, go to the “People” tab, select the desired team member, and assign the appropriate role from the dropdown menu.
Using Comments and Discussions
Communication is crucial for successful project management, and Smartsheets makes it easy to collaborate and communicate within the platform. You can use the comments feature to leave comments on specific cells, sheets, or rows to provide feedback or ask questions. Additionally, you can initiate discussions within Smartsheets to have more in-depth conversations with your team members. Simply click on the desired cell, sheet, or row and select the comments or discussions option.

Managing Document Sharing
As you work on your project, you may need to share specific documents or sheets with external stakeholders or clients. Smartsheets allows you to easily manage document sharing by creating shareable links or sending email invitations to collaborators. You can control the level of access each recipient has, whether it’s view-only, view and edit, or comment-only access. To manage document sharing, simply click on the desired document or sheet, select the “Share” option, and customize the sharing settings.
Task Management
Now that your project is set up and you’re collaborating effectively with your team, it’s time to dive into task management. This section will guide you through the steps of creating and assigning tasks, setting deadlines, tracking task progress, and using dependencies and predecessors in Smartsheets.
Creating and Assigning Tasks
Tasks are the building blocks of your project, and Smartsheets provides a comprehensive set of tools to manage them effectively. To create a new task, simply select the desired row in your project sheet and enter the task details. You can assign tasks to specific team members, set start and end dates, and add additional information such as priority and task dependencies.
Setting Task Deadlines
Deadlines are critical for keeping your project on track. Smartsheets allows you to set task deadlines and reminders to ensure that tasks are completed on time. You can easily set deadlines by entering the desired date in the deadline column, and Smartsheets will automatically track and notify you when a task due date is approaching.
Tracking Task Progress
Effective task management requires keeping a close eye on task progress. Smartsheets provides various tools to help you track and monitor task progress. You can use the progress column to visually track completion percentages, add status indicators to tasks, and even create custom reports and dashboards to get a holistic view of your project’s progress.
Using Dependencies and Predecessors
In complex projects, tasks often have dependencies on each other, meaning that one task cannot start until another is completed. Smartsheets allows you to easily manage task dependencies and predecessors. You can set dependencies between tasks, indicating the order in which they need to be completed. This helps you better understand the impact of delayed or completed tasks on the overall project timeline.
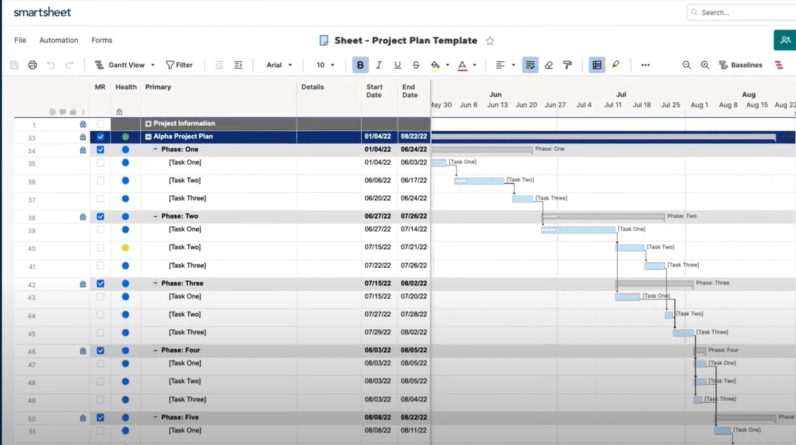
Gantt Chart
A Gantt chart is a visual representation of your project’s timeline, tasks, and dependencies. Smartsheets offers a powerful Gantt chart feature that allows you to create, manage, and update your project timeline with ease. This section will cover how to create a Gantt chart view, add dependencies and milestones, adjust timeline and milestone dates, and update Gantt chart progress.

Creating a Gantt Chart View
To create a Gantt chart view in Smartsheets, simply select the desired project sheet and navigate to the “Views” tab. Click on the “Add View” button and select “Gantt chart” from the dropdown menu. Smartsheets will generate a Gantt chart view based on your project data, displaying your tasks, their dependencies, and the project timeline.
Adding Dependencies and Milestones
Dependencies and milestones are crucial elements of a Gantt chart. With Smartsheets, you can easily add dependencies between tasks and milestones to accurately represent the sequencing of your project. Simply click on the desired task or milestone, select the “Dependencies” option, and specify the task dependency or milestone relationship.
Adjusting Timeline and Milestone Dates
As your project progresses, you may need to adjust timelines and milestone dates to reflect any changes or delays. Smartsheets allows you to easily edit and update your Gantt chart to accurately represent the current state of your project. Simply click on the desired task or milestone, select the “Edit” option, and adjust the dates accordingly.
Updating Gantt Chart Progress
Regularly updating your Gantt chart with the latest progress is essential to keep your project on track. Smartsheets provides various tools to update and track task progress directly within the Gantt chart view. You can visually mark completed tasks, update task durations, and even create color-coded progress indicators to quickly identify tasks that need attention.
Resource Management
Managing project resources efficiently is crucial for project success. Smartsheets offers robust resource management features to help you effectively allocate and track resources. This section will cover adding and managing resources, assigning resources to tasks, tracking resource workloads, and visualizing resource allocation.
Adding and Managing Resources
To effectively manage your project resources in Smartsheets, you need to add and maintain a comprehensive list of resources. Resources can include team members, equipment, materials, or any other assets required for your project. Smartsheets allows you to create a resource list and store relevant information such as resource names, contact details, and availability.

Assigning Resources to Tasks
Once you have your resource list set up, you can easily assign resources to specific tasks in Smartsheets. Assigning resources helps you accurately allocate the necessary resources to each task, ensuring that your project runs smoothly. To assign resources, simply select the desired task, click on the resource column, and choose the appropriate resource from the dropdown menu.
Tracking Resource Workloads
Monitoring resource workloads is essential for effective resource management. Smartsheets provides tools to track and visualize resource workloads, allowing you to identify resource bottlenecks or overutilization. You can use the resource workload view to see a comprehensive overview of resource allocations and make necessary adjustments to optimize resource usage.
Visualizing Resource Allocation
To get a holistic view of your project’s resource allocation, Smartsheets offers various visualization options. You can create charts, graphs, and reports to visually represent resource usage and allocations. These visualizations help you identify any imbalances or conflicts in resource allocation, enabling you to make informed decisions and adjustments to keep your project on track.
Reporting and Analytics
Smartsheets offers a range of reporting and analytics tools to help you gain insights into your project’s performance. This section will cover how to generate project reports, create custom dashboards, utilize charts and graphs, and analyze project data.
Generating Project Reports
Smartsheets allows you to generate comprehensive project reports with just a few clicks. With a variety of pre-built report templates to choose from, you can quickly create reports that showcase project status, progress, resource utilization, and more. These reports are a great way to communicate project performance to stakeholders and keep everyone informed.
Creating Custom Dashboards
Smartsheets’ custom dashboards allow you to consolidate and visualize key project metrics and data in one place. You can create personalized dashboards that showcase real-time project information, such as task progress, milestones, upcoming deadlines, and resource allocations. Custom dashboards provide a high-level overview of your project’s performance and help you quickly identify any issues or areas that require attention.

Using Charts and Graphs
Visualizing project data using charts and graphs is an effective way to gain insights and understand trends. Smartsheets offers a variety of chart and graph styles to choose from, including bar charts, line graphs, pie charts, and more. You can create charts and graphs based on various project metrics, such as task duration, resource utilization, and project costs.
Analyzing Project Data
Smartsheets allows you to leverage powerful data analysis features to gain deeper insights into your project. You can use formulas and functions to perform calculations, create custom metrics, and analyze trends. With the ability to apply filters, sort data, and perform data aggregations, you can manipulate and analyze project data to make informed decisions and optimizations.
Automating Workflows
Automation is a key feature in Smartsheets that helps streamline your project management processes. This section will cover creating automated alerts and notifications, setting up reminders and approvals, utilizing data validation, and configuring workflows.
Creating Automated Alerts and Notifications
Smartsheets allows you to set up automated alerts and notifications to keep you and your team informed about important updates and deadlines. You can create custom rules to trigger notifications based on specific conditions, such as task completion, approaching deadlines, or changes to critical project parameters. These automated alerts save you time and ensure that everyone is on the same page.
Setting up Reminders and Approvals
Reminders and approvals are essential components of an efficient project management process. Smartsheets provides tools to set up reminders for upcoming tasks, milestones, or other project events. Additionally, you can configure approval workflows to ensure that critical project deliverables go through the necessary review and approval processes before moving to the next stage.
Utilizing Data Validation
Data validation helps you maintain data integrity and consistency in your project sheets. Smartsheets allows you to set up data validation rules, ensuring that only valid and accurate data is entered. You can define validation criteria for specific columns, such as date ranges, dropdown lists, or numeric constraints. Data validation helps prevent errors and ensures that your project data is reliable.
Configuring Workflows
Smartsheets’ workflow automation capabilities enable you to streamline and standardize your project management processes. You can configure custom workflows that automate repetitive tasks, approvals, and notifications. Workflows help reduce manual effort, increase efficiency, and ensure consistency across your projects. Take advantage of Smartsheets’ workflow features to create a smooth and efficient project management process.
Integrations
Smartsheets offers seamless integration with other tools and apps, allowing you to connect and consolidate your project management workflow. This section will cover connecting with other tools and apps, importing and exporting data, integrating with communication platforms, and syncing with your calendar and email.
Connecting with Other Tools and Apps
To enhance your project management experience, Smartsheets integrates with popular tools and apps. You can connect with tools such as Microsoft Office, Google Drive, Salesforce, and more. These integrations allow you to seamlessly import and export data, collaborate across platforms, and consolidate your project management workflow.
Importing and Exporting Data
Smartsheets provides options to import and export your project data to and from other file formats. Whether you need to import data from Excel or export a project sheet to a PDF, Smartsheets has you covered. Simply navigate to the “File” menu and select the relevant import or export option. This flexibility ensures that you can work with your project data in the most convenient and compatible format.
Integrating with Communication Platforms
Effective communication is key in any project, and Smartsheets integrates with popular communication platforms such as Slack and Microsoft Teams. You can easily connect your Smartsheets workspace with these platforms to ensure seamless collaboration and communication with your team. Integration with communication platforms streamlines project discussions, updates, and notifications, allowing your team to stay connected and informed.
Syncing with Calendar and Email
To keep track of important project deadlines and events, Smartsheets offers calendar and email integration. You can sync your project tasks, milestones, and events with your favorite calendar application, such as Google Calendar or Outlook. This integration ensures that you have a centralized view of your project schedule and never miss an important deadline. Additionally, Smartsheets allows you to set up email notifications to receive updates and reminders directly in your inbox.
Tips and Best Practices
To help you make the most of Smartsheets for project management, here are some tips and best practices to keep in mind:
Keeping Your Sheets Organized
Maintaining an organized project sheet is crucial for effective project management. Use consistent naming conventions, color coding, and grouping to keep your sheets structured and easy to navigate. Utilize folders to categorize related sheets and keep your project assets well-organized.
Using Templates for Efficiency
Smartsheets offers a wide range of pre-built templates that can save you time and effort in setting up your projects. Take advantage of these templates for common project types, such as marketing campaigns, product launches, or event planning. Customize these templates to suit your specific project requirements, and you’ll be up and running in no time.
Utilizing Formulas and Functions
Smartsheets provides a powerful set of formulas and functions that can help automate calculations and perform advanced data manipulations. Familiarize yourself with commonly used formulas such as SUM, COUNT, or IF statements to streamline your data analysis and reporting processes.
Implementing Version Control
If you’re working on complex projects with multiple revisions, consider implementing version control practices in Smartsheets. You can create snapshots of your project sheets at different stages and label them accordingly. This ensures that you have a historical record of your project’s progress and allows you to revert to previous versions if needed.
Remember, practice makes perfect! Don’t be afraid to explore the vast range of features and functionalities Smartsheets has to offer. With time and experience, you’ll become a seasoned project management expert using this powerful tool. Happy managing!